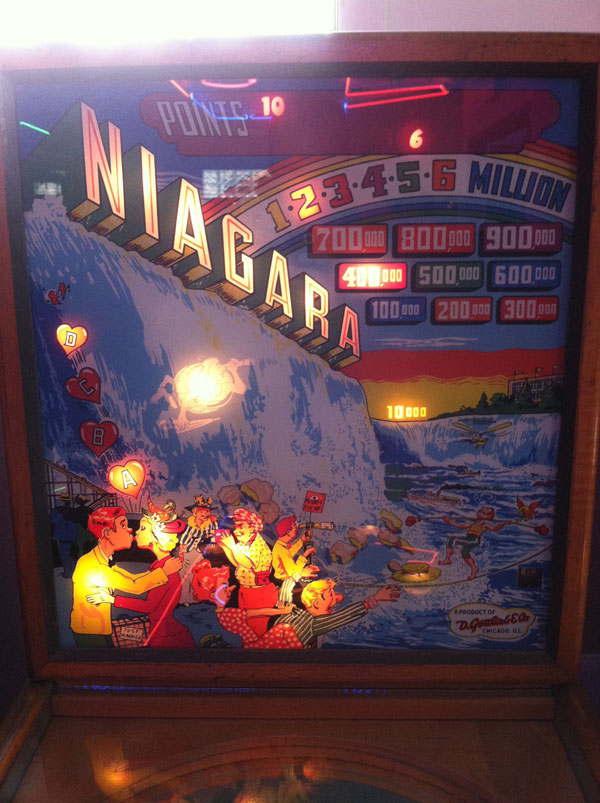
I have a project in mind. I bought a reproduction backglass of a 1951 Gottlieb Niagara pinball and I want to make a wall hanging that lights up and animates the various sections of the backglass, especially the hidden parts.
Niagara, Gottlieb, 12/51, 1200 produced, 4 trap holes. wood rail pinball. Artwork by Roy Parker. Reproduction backglass by Shay Arcade.
Most pinball backglasses from the electro-mechanical era, basically anything with score reels, late 1970s and older pinball machines, had sections that only lit when the game needed to communicate something like which ball the game was on, game over, tilt or match.
And then there are several lights that provide general illumination (GI) for the title and to attract players.
Before score reels, the scores were shown by lighting hidden numbers on the backglass. Some backglasses like the Niagara one even had hidden animation sequences, such as the guy going over the falls in a barrel.
The backglasses of this time period were silkscreened. Each color was layered on one at a time. A final silver layer was used block light where it wasn’t wanted, while a white layer allowed light to pass through.
This Gottlieb Niagara pinball backglass has a lot of different areas that can be lit for interesting animations. The plan is to use an Arduino and the FastLED library to program a string of WS2811 RBB LEDs which can be individually addressed.

My string of lights has 50 LEDs so I have to figure out where they should go. There are more than 50 possible things to illuminate. I count around 56 or 57 different elements. Actually, the total number of lights needed is closer to 80! I’ll need two strings of lights and connect them. I’ll also need to snip off a few and solder the wires — sometimes the gaps between lights require more distance.

Step One: Setting Up the Arduino
First things first. I want to get comfortable with the programming involved. I’ve worked on some basic Arduino programs in the past and have a bunch of old Arduinos laying around.
The first step was installing the Arduino IDE app and running the test sketch.
/*
  Blink

  Turns an LED on for one second, then off for one second, repeatedly.

  Most Arduinos have an on-board LED you can control. On the UNO, MEGA and ZERO
  it is attached to digital pin 13, on MKR1000 on pin 6. LED_BUILTIN is set to
  the correct LED pin independent of which board is used.
  If you want to know what pin the on-board LED is connected to on your Arduino
  model, check the Technical Specs of your board at:
  https://www.arduino.cc/en/Main/Products

  modified 8 May 2014
  by Scott Fitzgerald
  modified 2 Sep 2016
  by Arturo Guadalupi
  modified 8 Sep 2016
  by Colby Newman

  This example code is in the public domain.

  https://www.arduino.cc/en/Tutorial/BuiltInExamples/Blink
*/

// the setup function runs once when you press reset or power the board
void setup() {
  // initialize digital pin LED_BUILTIN as an output.
  pinMode(LED_BUILTIN, OUTPUT);
}

// the loop function runs over and over again forever
void loop() {
  digitalWrite(LED_BUILTIN, HIGH);   // turn the LED on (HIGH is the voltage level)
  delay(1000);                       // wait for a second
  digitalWrite(LED_BUILTIN, LOW);    // turn the LED off by making the voltage LOW
  delay(1000);                       // wait for a second
}
Success! I got the Arduino to communicate with my computer, upload the sketch and run it. Onboard LED is blinking.
I’m using an Arduino Duemilanlove with an ATmega328P set to Com Port 4 but you can use just about any Arduino including the small Nanos.
Step Two: Controlling LEDs
I’ll be using TWO strings of ALITOVE (WS2811 12mm Diffused Digital RGB LED Pixel Light Individually Addressable Round LED Pixels Module) pixels for my project.
I’ll also need a power supply for the LED string so I don’t strain the Arduino board. Alitove sells a cheap one that comes with a nice adaptor that fits the lights.
Hook up the power wires to the power supply. You’ll notice that there is a blue wire going to ground (GND) and a red wire that goes to 5V.
The adapter has + and -. So the blue (GND) goes to the negative (-) and the red (5V) goes to the positive (+)

Now on the Arduino we connect the LED string to the Arduino board using wires. I suggest having a selection of these on hand:
Here is the basic code to make one LED blink. The backglass animation project will basically be this code repeated for various lights. I’ll be mapping out the lights and numbering them so I know which ones to turn on and off.
#include <FastLED.h>

#define LED_PIN     5
#define NUM_LEDS    50
#define BRIGHTNESS  50
#define LED_TYPE    WS2811
#define COLOR_ORDER GRB
CRGB leds[NUM_LEDS];


void setup() {
    delay( 3000 ); // power-up safety delay
    FastLED.addLeds<LED_TYPE, LED_PIN, COLOR_ORDER>(leds, NUM_LEDS).setCorrection( TypicalLEDStrip );
    FastLED.setBrightness(  BRIGHTNESS );

   }


void loop() {
  // Turn the LED on, then pause
  leds[0] = CRGB::Red;
  FastLED.show();
  delay(500);
  // Now turn the LED off, then pause
  leds[0] = CRGB::Black;
  FastLED.show();
  delay(500);
}
NOTE: You may have to change the #define COLOR_ORDER GRB line if you get a different color than red. I had to change it to “RBG”
Here is the programming for one section of the backglass – spelling out the work Niagara one letter at a time.
#include <FastLED.h>

#define LED_PIN     5
#define NUM_LEDS    50
#define BRIGHTNESS  50
#define LED_TYPE    WS2811
#define COLOR_ORDER GRB
CRGB leds[NUM_LEDS];


void setup() {
    delay( 3000 ); // power-up safety delay
    FastLED.addLeds<LED_TYPE, LED_PIN, COLOR_ORDER>(leds, NUM_LEDS).setCorrection( TypicalLEDStrip );
    FastLED.setBrightness(  BRIGHTNESS );

   }


void loop() {
  // Turn the LED on, then pause
  leds[0] = CRGB::Red;
  FastLED.show();
  delay(500);
  // Now turn the LED off, then pause
  leds[0] = CRGB::Black;
  FastLED.show();
  delay(500);

  //NIAGRA Animation - each letter comes on one at time and then the whole word blinks a couple of times

//Letter N
  leds[10] = CRGB::White;
  FastLED.show();
  delay(500);
  //Letter I
  leds[11] = CRGB::White;
  FastLED.show();
  delay(500);
  //Letter A
  leds[12] = CRGB::White;
  FastLED.show();
  delay(500);
   //Letter G
  leds[13] = CRGB::White;
  FastLED.show();
  delay(500);
   //Letter Second A
  leds[14] = CRGB::White;
  FastLED.show();
  delay(500);
   //Letter R
  leds[15] = CRGB::White;
  FastLED.show();
  delay(500);
   //Letter Third A
  leds[16] = CRGB::White;
  FastLED.show();
  delay(1500);
  // Now turn the NIAGRA word off and pause
  leds[10]=CRGB::Black;
  leds[11]=CRGB::Black;
  leds[12]=CRGB::Black;
  leds[13]=CRGB::Black;
  leds[14]=CRGB::Black;
  leds[15]=CRGB::Black;
  leds[16]=CRGB::Black;
  FastLED.show();
  delay(500);

}
This is amateurish programming since the coding could be done much simpler and neater using arrays. Once I map out the backglass, I’ll segment various elements into arrays then I can turn off a set of lights with one command instead of a long list of commands.
Final code (until I change it again)
#include <FastLED.h>

#define LED_PIN     5
#define NUM_LEDS    72
#define BRIGHTNESS  100
#define LED_TYPE    WS2811
#define COLOR_ORDER RBG
CRGB leds[NUM_LEDS];


void setup() {
    delay( 3000 ); // power-up safety delay
    FastLED.addLeds<LED_TYPE, LED_PIN, COLOR_ORDER>(leds, NUM_LEDS).setCorrection( TypicalLEDStrip );
    FastLED.setBrightness(  BRIGHTNESS );

   }


void loop() {


  // Turn the LED on, then pause
  leds[0] = CRGB::Red;
  FastLED.show();
  delay(500);
  // Now turn the LED off, then pause
  leds[0] = CRGB::Black;
  FastLED.show();
  delay(500);


 // Turn On Crowd Turn on 0-9
  leds[0] = CRGB::White;
  leds[1] = CRGB::White;
  leds[2] = CRGB::White;
  leds[3] = CRGB::White;
  leds[4] = CRGB::White;
  leds[5] = CRGB::White;
  leds[6] = CRGB::White;
  leds[7] = CRGB::White;
  leds[8] = CRGB::White;
  leds[9] = CRGB::White;
  FastLED.show();

  //Turn on Niagra 65-71

    //Letter N
    leds[65] = CRGB::White;
    FastLED.show();
    delay(500);
    //Letter I
    leds[66] = CRGB::White;
    FastLED.show();
    delay(500);
    //Letter A
    leds[67] = CRGB::White;
    FastLED.show();
    delay(500);
     //Letter G
    leds[68] = CRGB::White;
    FastLED.show();
    delay(500);
     //Letter Second A
    leds[69] = CRGB::White;
    FastLED.show();
    delay(500);
     //Letter R
    leds[70]= CRGB::White;
    FastLED.show();
    delay(500);
     //Letter Third A
    leds[71] = CRGB::White;
    FastLED.show();
    delay(500);
    FastLED.show();

  //Move a pixel around the TOP POINTS

  for (int i = 0; i < 5; i++){
    for (int i = 52; i < 64; i++) {
    leds[i] = CRGB::White;  //set the led to white
    FastLED.show();       //start the leds
    leds[i] = CRGB::Black;  //clear the led
    delay(100);          //Wait before moving to next led
 }}


  // Lovers 6&7 and Hearts 10-14

  for (int i = 0; i < 3; i++){
    // Light LOVERS
     leds[6] = CRGB::Red;
     leds[7] = CRGB::Red;
    FastLED.show();
    delay(500);
     //Hearts lighting one by one
    leds[10] = CRGB:: Red;
    FastLED.show();
    delay(500);
    leds[10] = CRGB::Black;
    FastLED.show();
    delay(500);
    leds[11] = CRGB::Red;
    FastLED.show();
    delay(500);
    leds[11] = CRGB::Black;
    FastLED.show();
    delay(500);
    leds[12] = CRGB::Red;
    FastLED.show();
    delay(500);
    leds[12] = CRGB::Black;
    FastLED.show();
    delay(500);
    leds[13] = CRGB::Red;
    FastLED.show();
    delay(500);
    leds[13] = CRGB::Black;
    FastLED.show();
    delay(500);
    leds[14] = CRGB::Red;
    FastLED.show();
    delay(500);
    leds[14] = CRGB::Black;
    FastLED.show();
    leds[6] = CRGB:: White;
    leds[7] = CRGB:: White;
    FastLED.show();
    delay(2000);
  }


  //NIAGRA Animation - each letter comes on one at time and then the whole word blinks a couple of times


  for (int i = 0; i < 5; i++){
    //Letter N
    leds[65] = CRGB::White;
    FastLED.show();
    delay(500);
    //Letter I
    leds[66] = CRGB::White;
    FastLED.show();
    delay(500);
    //Letter A
    leds[67] = CRGB::White;
    FastLED.show();
    delay(500);
     //Letter G
    leds[68] = CRGB::White;
    FastLED.show();
    delay(500);
     //Letter Second A
    leds[69] = CRGB::White;
    FastLED.show();
    delay(500);
     //Letter R
    leds[70]= CRGB::White;
    FastLED.show();
    delay(500);
     //Letter Third A
    leds[71] = CRGB::White;
    FastLED.show();
    delay(500);
    leds[65] = CRGB::Black;
    leds[66] = CRGB::Black;
    leds[67] = CRGB::Black;
    leds[68] = CRGB::Black;
    leds[69] = CRGB::Black;
    leds[70] = CRGB::Black;
    leds[71] = CRGB::Black;
    FastLED.show();
    delay(500);
  }

   //Turn on Niagra 65-71

    //Letter N
    leds[65] = CRGB::White;
    FastLED.show();
    delay(500);
    //Letter I
    leds[66] = CRGB::White;
    FastLED.show();
    delay(500);
    //Letter A
    leds[67] = CRGB::White;
    FastLED.show();
    delay(500);
     //Letter G
    leds[68] = CRGB::White;
    FastLED.show();
    delay(500);
     //Letter Second A
    leds[69] = CRGB::White;
    FastLED.show();
    delay(500);
     //Letter R
    leds[70]= CRGB::White;
    FastLED.show();
    delay(500);
     //Letter Third A
    leds[71] = CRGB::White;
    FastLED.show();
    delay(500);
    FastLED.show();

  //Move a pixel around the 100s

  for (int i = 0; i < 5; i++){
    for (int i = 27; i < 51; i++) {
    leds[i] = CRGB::White;  //set the led to white
    FastLED.show();       //start the leds
    delay(50);          //Wait before moving to next led
    leds[i] = CRGB::Black;  //clear the led
    delay(25);          //Wait before moving to next led
 }}


  //RAINBOW 45-51 On one at time, off and then repeat

  for (int i = 0; i < 3; i++){

    leds[45] = CRGB::Yellow;
    FastLED.show();
    delay(300);
    leds[46] = CRGB::Orange;
    FastLED.show();
    delay(300);
    leds[47] = CRGB::Red;
    FastLED.show();
    delay(300);
    leds[48] = CRGB::Purple;
    FastLED.show();
    delay(300);
    leds[49] = CRGB::Green;
    FastLED.show();
    delay(300);
    leds[50] = CRGB::Orange;
    FastLED.show();
    delay(300);
    leds[51] = CRGB::Blue;
    FastLED.show();
    delay(300);
    leds[45] = CRGB::Black;
    delay(300);
    leds[46] = CRGB::Black;
    delay(300);
    leds[47] = CRGB::Black;
    delay(300);
    leds[48] = CRGB::Black;
    delay(300);
    leds[49] = CRGB::Black;
    delay(300);
    leds[50] = CRGB::Black;
    delay(300);
    leds[51] = CRGB::Black;
    FastLED.show();
    delay(100);


  }

 //Move a pixel around the ALL POINTS Slowly

  for (int i = 0; i < 5; i++){
    for (int i = 27; i < 64; i++) {
    leds[i] = CRGB::White;  //set the led to white
    FastLED.show();       //start the leds
    delay(700);          //Wait before moving to next led
    leds[i] = CRGB::Black;  //clear the led
    delay(700);
 }}


  //OVER FALLS IN A BARRELL 15-23 but not 19

  leds[15] = CRGB::White;
  FastLED.show();
  delay(700);
  leds[15] = CRGB::Black;

  leds[16] = CRGB::White;
  FastLED.show();
  delay(700);
  leds[16] = CRGB::Black;

   leds[17] = CRGB::White;
  FastLED.show();
  delay(700);
  leds[17] = CRGB::Black;

  leds[18] = CRGB::White;
  FastLED.show();
  delay(700);
  leds[18] = CRGB::Black;

   leds[20] = CRGB::White;
  FastLED.show();
  delay(700);
  leds[20] = CRGB::Black;

  leds[21] = CRGB::White;
  FastLED.show();
  delay(700);
  leds[21] = CRGB::Black;

   leds[22] = CRGB::White;
  FastLED.show();
  delay(700);
  leds[22] = CRGB::Black;

  leds[23] = CRGB::White;
  FastLED.show();
  delay(1000);
  leds[23] = CRGB::Black;
}

